
Why Window Trim Painting Matters for Your Home
Painting your window trim is more than just a cosmetic upgrade—it plays a vital role in preserving the overall integrity of your home. Well-maintained and properly painted trim enhances curb appeal, giving your home a clean, finished look that adds to its value. But beyond aesthetics, painted trim acts as a protective barrier against the elements. Unpainted or poorly maintained trim can allow moisture to seep in, leading to wood rot, mold growth, and costly repairs.
At Smith & Company Painting, we understand that high-quality trim work requires more than just a coat of paint. It involves proper surface preparation, choosing the right products for durability, and applying professional techniques to ensure a smooth, lasting finish. Whether you’re updating the look of your home or maintaining its exterior, our experienced team ensures your window trim remains both beautiful and protected for years to come.
When to Repaint or Replace Window Trim in McMinnville and Portland
Living in the Pacific Northwest, particularly in areas like McMinnville and Portland, means your home is regularly exposed to damp weather, fluctuating temperatures, and seasonal storms. These conditions can take a toll on your home’s exterior, especially your window trim. Knowing when to repaint or replace window trim is essential to maintaining your home’s curb appeal and structural integrity.
Signs It’s Time to Repaint
Repainting your window trim is often the first step in protecting it from moisture and sun damage. Consider repainting if you notice:
-
Peeling or flaking paint – This indicates that the protective barrier has failed, exposing the wood to the elements.
-
Faded or discolored paint – Prolonged UV exposure can cause paint to fade, which not only looks unattractive but also offers less protection.
-
Small cracks in the paint – These can allow moisture to seep in, eventually leading to rot if left untreated.
In McMinnville and Portland, it’s a good idea to repaint exterior trim every 4–7 years, depending on the paint quality and exposure to weather.
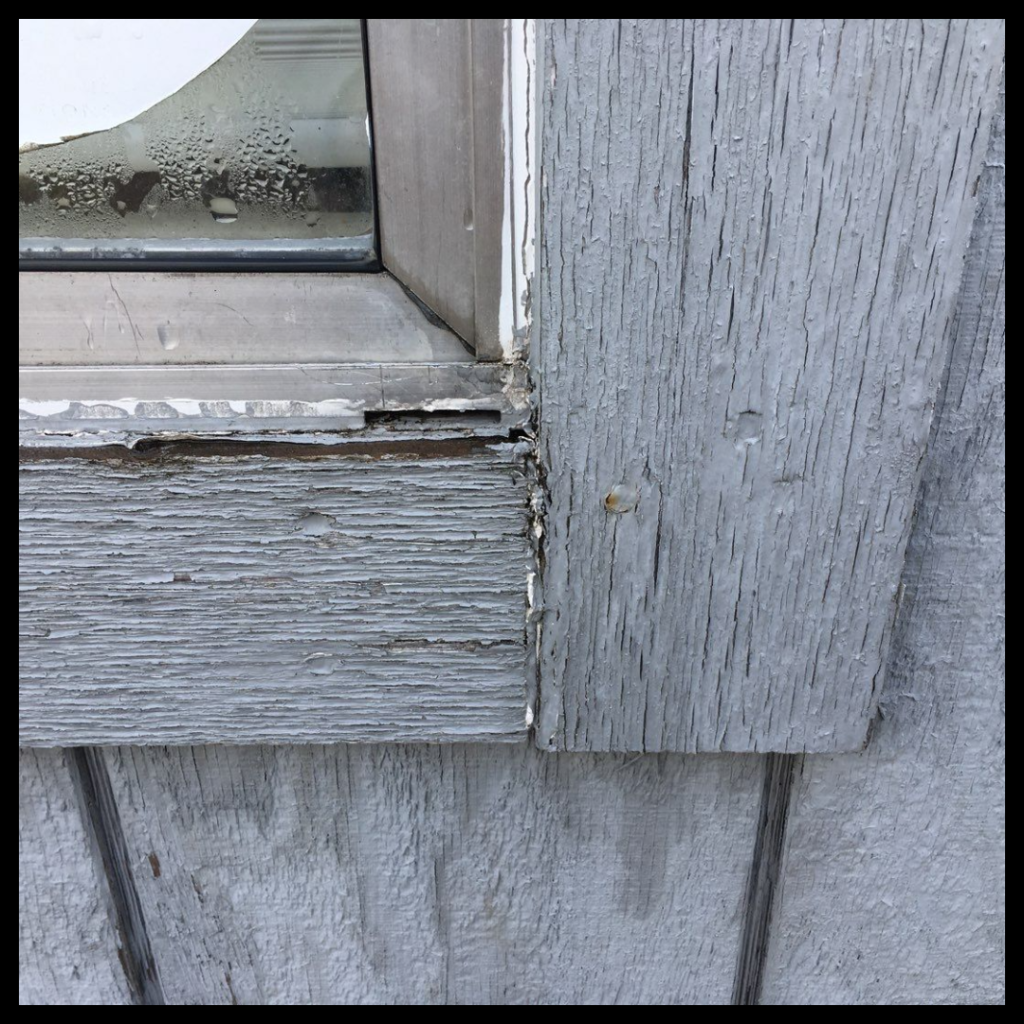
When Replacement is Necessary
Sometimes, repainting isn’t enough—especially if the trim has already suffered structural damage. Consider replacing your window trim if you observe:
-
Rotting or soft wood – A clear sign that moisture has penetrated deeply. Soft spots can be probed gently with a screwdriver.
-
Warped or bowed trim boards – This can indicate internal moisture damage or aging materials.
-
Persistent mildew or mold – If cleaning and repainting don’t eliminate mildew or mold, the underlying wood may be compromised.
-
Insect damage – Termites and carpenter ants are rare but not unheard of in the Willamette Valley.
Why Timely Maintenance Matters
McMinnville and Portland’s wet winters and mild, rainy springs create ideal conditions for wood rot and mildew growth. Regularly inspecting and maintaining your window trim can:
-
Extend the life of your windows
-
Prevent costly water intrusion and structural damage
-
Maintain energy efficiency by keeping window seals tight
-
Enhance your home’s appearance and value
Pro Tip
Schedule trim inspections during the drier summer months. This gives you time to repaint or replace before the wet season sets in. Early fall is also a good window of time to complete this work before the heavy rains begin.
Understanding Window Trim Materials for Optimal Painting Results
Different trim materials require different approaches. Here’s how to handle the most common types:
Wood Trim
-
Best for: Traditional homes, interiors and exteriors
-
Challenges: Prone to rot without protection
-
Painting Tip: Use an oil-based or high-quality acrylic primer. Finish with durable exterior paint.
PVC & Composite Trim
-
Best for: High-moisture areas and modern builds
-
Challenges: Can resist paint adhesion
-
Painting Tip: Use 100% acrylic latex paint. Always clean first and use a bonding primer if needed.
MDF (Medium-Density Fiberboard)
-
Best for: Interior trim
-
Challenges: Absorbs moisture easily
-
Painting Tip: Prime all sides (especially edges). Use a water- or shellac-based primer and sand between coats.
Metal Trim
-
Best for: Some commercial or modern designs
-
Challenges: Can rust without proper treatment
-
Painting Tip: Remove rust, apply rust-inhibiting or etching primer, then use enamel or oil-based paint.
How to Prepare Window Trim for Painting Like a Pro
Painting window trim may seem like a minor task, but it can dramatically elevate the look of a room. However, the secret to a professional-looking finish lies not in the painting itself — but in the preparation. Here’s how to do it right:
Clean the Trim Thoroughly
Before anything else, remove dirt, dust, grease, and grime.
-
Use: A mild detergent solution or TSP (trisodium phosphate) works best.
-
Why: Paint won’t adhere well to dirty or oily surfaces, leading to flaking or peeling down the line.
-
Tip: Don’t forget the tops of the trim — they collect dust too.
Let the trim dry completely before moving to the next step.
Sand the Surface
Sanding is critical, especially if the trim has a glossy or varnished finish.
-
Use: Medium-grit sandpaper (around 120–150 grit) to dull glossy surfaces, then fine-grit (180–220) to smooth it out.
-
Why: It creates a slightly rough texture for the new paint or primer to grip.
-
Tip: Use a sanding sponge to get into the curves and profiles of decorative trim.
After sanding, wipe the surface with a tack cloth or microfiber rag to remove dust.
Fill Gaps, Cracks & Holes
Any imperfections will be magnified by a fresh coat of paint, so fix them now.
-
Nail holes & dents: Use wood filler or spackle; let it dry, then sand smooth.
-
Gaps at joints or edges: Use paintable caulk for clean, seamless lines.
-
Why: This ensures a smooth, professional-looking finish with no distracting flaws.
-
Tip: Cut the caulk tube at a 45-degree angle for better control, and smooth with a damp finger or caulk tool.
Scrape Loose or Peeling Paint
If you’re working on older or exterior trim, inspect for paint that’s flaking or peeling.
-
Use: A putty knife or paint scraper to remove it.
-
Why: Painting over loose paint will result in a weak bond and more peeling later.
-
Tip: If there’s a lot of flaking, consider using a sanding block or an orbital sander to even it out.
Tape Off Surrounding Areas
Neat edges make all the difference, especially around windows and walls.
-
Apply painter’s tape: Along the edges where the trim meets glass, walls, or window sashes.
-
Why: This ensures clean, crisp paint lines and protects other surfaces.
-
Tip: Use high-quality painter’s tape designed for clean release. Press it down firmly to avoid bleeding.
Optional but Highly Recommended:
Prime the Trim (if needed)
-
When to prime: If you’re painting over raw wood, stained surfaces, patched areas, or switching from oil- to water-based paint.
-
Use: A bonding primer suited for trim and woodwork.
-
Why: Primer helps paint stick better and covers stains, wood tannins, or dark colors.
Final Step Before Painting:
Do one final check for dust, tape alignment, or missed imperfections. Once everything looks clean, smooth, and prepped — you’re ready to paint like a pro!
Choosing the Best Paint and Primers for Window Trim
Recommended Paint Types
Interior Window Trim:
For inside your home, high-quality acrylic latex paint is the go-to choice. Here’s why:
-
Durability: Acrylic latex paint is flexible and resists cracking, peeling, and yellowing over time, which is important for areas like window trim that may get frequent touching or cleaning.
-
Easy Cleaning: Since trim can collect dust and fingerprints, a semi-gloss or satin finish works best because these finishes are smooth, less porous, and can be wiped clean easily without damaging the paint.
-
Appearance: Semi-gloss finishes provide a subtle shine that highlights the trim’s architectural detail, while satin offers a softer sheen for a more understated look.
Exterior Window Trim:
Outside your home, window trim faces harsh environmental conditions — rain, sunlight, humidity, temperature swings, and sometimes even pests.
-
Weather-Resistant Acrylic Paints: These paints are specially formulated to withstand moisture without peeling or blistering. They also resist fading caused by UV rays, preserving color vibrancy.
-
These paints often contain additives for mildew resistance and enhanced adhesion to various surfaces, ensuring your trim stays protected and looking fresh longer.
Best Primers for Window Trim
Priming is an essential step before painting to ensure adhesion, prevent stains, and enhance durability.
Older Wood:
Old wood trim can be tricky because:
-
It often contains tannins or other natural oils that can seep through paint, causing bleed-through stains.
-
To prevent this, use a stain-blocking primer. These primers create a seal that locks in those stains and oils, preventing discoloration on your finished paint coat.
-
They also help cover imperfections and create a smooth surface for painting.
PVC and Metal Trim:
Trim made from PVC (vinyl) or metal needs special care:
-
These materials have smooth, non-porous surfaces, which can make paint adhesion difficult.
-
Use a bonding primer designed for plastics or metals. This primer promotes strong adhesion, so the paint doesn’t chip or peel off easily.
-
Bonding primers also improve the paint’s durability against expansion and contraction caused by temperature changes.
All Materials:
Regardless of the trim material:
-
Use paintable latex caulks to seal all joints, seams, and gaps before painting.
-
This not only prevents air and moisture infiltration but also results in a clean, professional finish by filling cracks that would otherwise be noticeable.
-
Caulks designed to be paintable ensure the paint sticks well and doesn’t peel off with the caulk.
Step-by-Step Window Trim Painting Process
Inspection & Assessment
Purpose: Understand what you’re working with and what needs to be done before painting.
-
Identify the trim material: Is it wood, MDF, PVC, or metal? Different materials require different preparation and primers.
-
Assess condition: Check for cracks, rot, peeling paint, or water damage. Look for any loose or missing pieces.
-
Determine prep needs: Decide if any repairs, sanding, or stripping of old paint are necessary before moving forward. This step ensures a smooth, lasting finish.
Surface Preparation
Purpose: Create a clean, smooth surface for the paint to adhere to.
-
Cleaning: Remove dirt, dust, grease, or mildew using appropriate cleaners (soap and water, TSP, or mild detergent). This helps prevent paint failure.
-
Sanding: Lightly sand the surface to smooth rough spots and dull glossy finishes, allowing the primer and paint to stick better.
-
Filling: Use wood filler or putty to fix dents, holes, and cracks, then sand smooth once dry. This makes the trim look flawless.
-
Protect surroundings: Mask off windows, walls, and floors with painter’s tape and drop cloths to avoid accidental splatters or drips.
Priming
Purpose: Prepare the surface to improve paint adhesion, block stains, and enhance durability.
-
Choose the right primer: Depending on trim material and condition, use oil-based, latex, or specialty primers (e.g., stain-blocking or bonding primers).
-
Application: Apply a smooth, even coat of primer with a brush or sprayer, covering all surfaces thoroughly. This seals the material and prevents peeling or discoloration later.
Painting
Purpose: Apply the topcoat(s) for protection and aesthetics.
-
Select premium paint: Use high-quality, durable paint designed for trim or woodwork, often semi-gloss or gloss finish for easy cleaning and a sharp look.
-
Apply two coats: Two coats ensure even color coverage, depth, and durability. The first coat is allowed to dry fully before the second is applied.
-
Use proper tools: Brushes with fine, angled bristles or a paint sprayer can deliver a smooth, professional finish without brush marks or drips.
-
Technique: Use long, even strokes and work in manageable sections to avoid lap marks and ensure a consistent finish.
Final Touches & Cleanup
Purpose: Finalize the job neatly and ensure customer satisfaction.
-
-
Remove painter’s tape carefully: Pull tape off at an angle while paint is slightly tacky to prevent peeling.
-
Touch-ups: Inspect the trim for any missed spots, drips, or uneven areas and carefully fix them.
-
Clean up: Dispose of used materials properly, wash brushes or tools, and tidy the work area so it’s left clean and ready for use.
-
Final inspection: Ensure the trim looks flawless and the customer is happy with the result.
-
Expert Tips for Painting Window Trim Successfully
Use a high-quality angled sash brush for clean lines.
Window trim often has detailed edges and corners. A high-quality angled sash brush is designed specifically to make painting these edges easier. The angled bristles help you get precise, sharp lines along the trim without accidentally painting onto the glass or wall. Cheaper brushes may shed bristles or cause uneven strokes, leading to a messy finish. Investing in a good brush not only improves the look but also reduces frustration and wasted paint.
Sand between coats for a professional, smooth finish.
After your first coat dries, lightly sanding the trim with fine-grit sandpaper removes any bumps, brush marks, or dust that settled in the paint. This step creates a smooth surface for the next coat to adhere to and ensures the final finish feels sleek and looks flawless. Skipping sanding can result in a rough texture or uneven appearance, making your paint job look amateurish. Just be sure to wipe off the sanding dust before applying the next coat.
Remove painter’s tape before paint fully dries to prevent peeling.
Painter’s tape is used to protect adjacent surfaces, but if you wait too long to remove it, the paint can dry and bond with the tape. Pulling off the tape later may peel away some of the paint from the trim, ruining your clean lines. To avoid this, remove the tape while the paint is still slightly tacky—usually within an hour or so of finishing the coat. Pull the tape back slowly at a 45-degree angle for best results.
Invest in premium paint to ensure long-lasting color and protection.
Window trim is exposed to a lot of wear—from sunlight to temperature changes to frequent cleaning. Using a high-quality, durable paint designed for trim or woodwork ensures your paint job will resist chipping, fading, and cracking over time. Premium paints often have better pigmentation for richer color and include protective ingredients like mildew resistance or UV blockers. Though they cost more upfront, they save money and effort in the long run by keeping your trim looking fresh and vibrant.
Interior vs. Exterior Window Trim Painting Considerations
| Feature | Interior Trim Painting | Exterior Trim Painting |
|---|---|---|
| Environment | Protected, controlled environment – no exposure to harsh weather. | Exposed to sun, rain, wind, temperature fluctuations, and other outdoor elements. |
| Finish Type | Semi-gloss or satin finish; offers easy cleaning and moderate sheen. | Semi-gloss or satin with UV and moisture resistance for durability outdoors. |
| Preparation Required | Cleaning and light sanding to ensure paint adhesion. | Scraping old paint, sanding surfaces, and priming to prevent peeling and moisture damage. |
| Paint Type | Water-based, low-VOC paint for indoor safety and easy cleanup. | Durable acrylic exterior paint designed for flexibility and weather resistance. |
Frequently Asked Questions About Window Trim Painting
How often should I repaint window trim in McMinnville?
Exterior trim usually requires repainting every 3-5 years, depending on weather exposure.
Can I paint over stained or unpainted wood trim?
Yes, with proper sanding and priming to prevent bleed-through.
Should I paint my window trim the same color as my walls?
Most homeowners opt for contrasting colors or classic white to highlight window features.
About Smith & Company Painting — Serving McMinnville to Portland, OR
Based in the heart of McMinnville, OR, Smith & Company Painting proudly serves homes and businesses from McMinnville to Portland. McMinnville is a charming city in Oregon’s Willamette Valley known for its vibrant downtown, beautiful vineyards, and rich history. The area’s climate—wet winters and dry summers—means your exterior window trim needs expert care to withstand seasonal changes.
Why Choose Smith & Company Painting for Window Trim Painting in McMinnville & Portland?
-
Licensed, insured, and bonded professional painters.
-
Over 20 years of expertise in residential and commercial painting.
-
Use of premium-quality paints and materials.
-
Clean, respectful, and efficient service teams.
-
Transparent, free estimates with no hidden fees.
Contact Smith & Company Painting today for your window trim painting needs and experience the best service from McMinnville to Portland!
Ready to Refresh Your Window Trim?
Let the experts at Smith & Company Painting bring new life to your home’s windows.
Contact us today for a no-obligation estimate!
Visit us: 570 SE Davis St, McMinnville, OR 97128
Call us: 503-472-4334
Learn more: smithandcompanypainting.com
Smith & Company Social Media Pages
Facebook Instagram Tiktok YouTube LinkedIn X
